How to make pillar candles?
Pillar candles are a beautiful way to brighten up any room while also adding a touch of elegance. Not only do they create a serene ambience but they also make for stunning home decor.
These candles are typically characterized by their cylindrical shape, which allows them to stand tall without any support, earning them the name ‘pillar’.
In this guide, we will walk you through the process of creating your pillar candles. From selecting the right wax and wick to the process of melting, pouring and moulding, we’ll cover it all.
So, whether you’re a craft enthusiast or someone looking for a unique gift idea, this easy-to-follow guide is perfect for you. Let’s dive into the mesmerizing world of candle-making!
Pillar Candle Making Process
Before we begin, let’s gather all the materials and tools needed for making pillar candles. You can find most of these items at your local craft supply store or online.
- Pillar wax (such as paraffin wax or soy wax)
- Pre-tabbed wicks
- Wick sustainers
- Double boiler or a large heatproof bowl and pot
- Thermometer
- Scissors
- Mold (metal or silicone)
- Mold release spray (optional)
- Dye blocks or liquid candle dye (optional)
- Fragrance oil (optional)
Steps To Make Pillar Candle
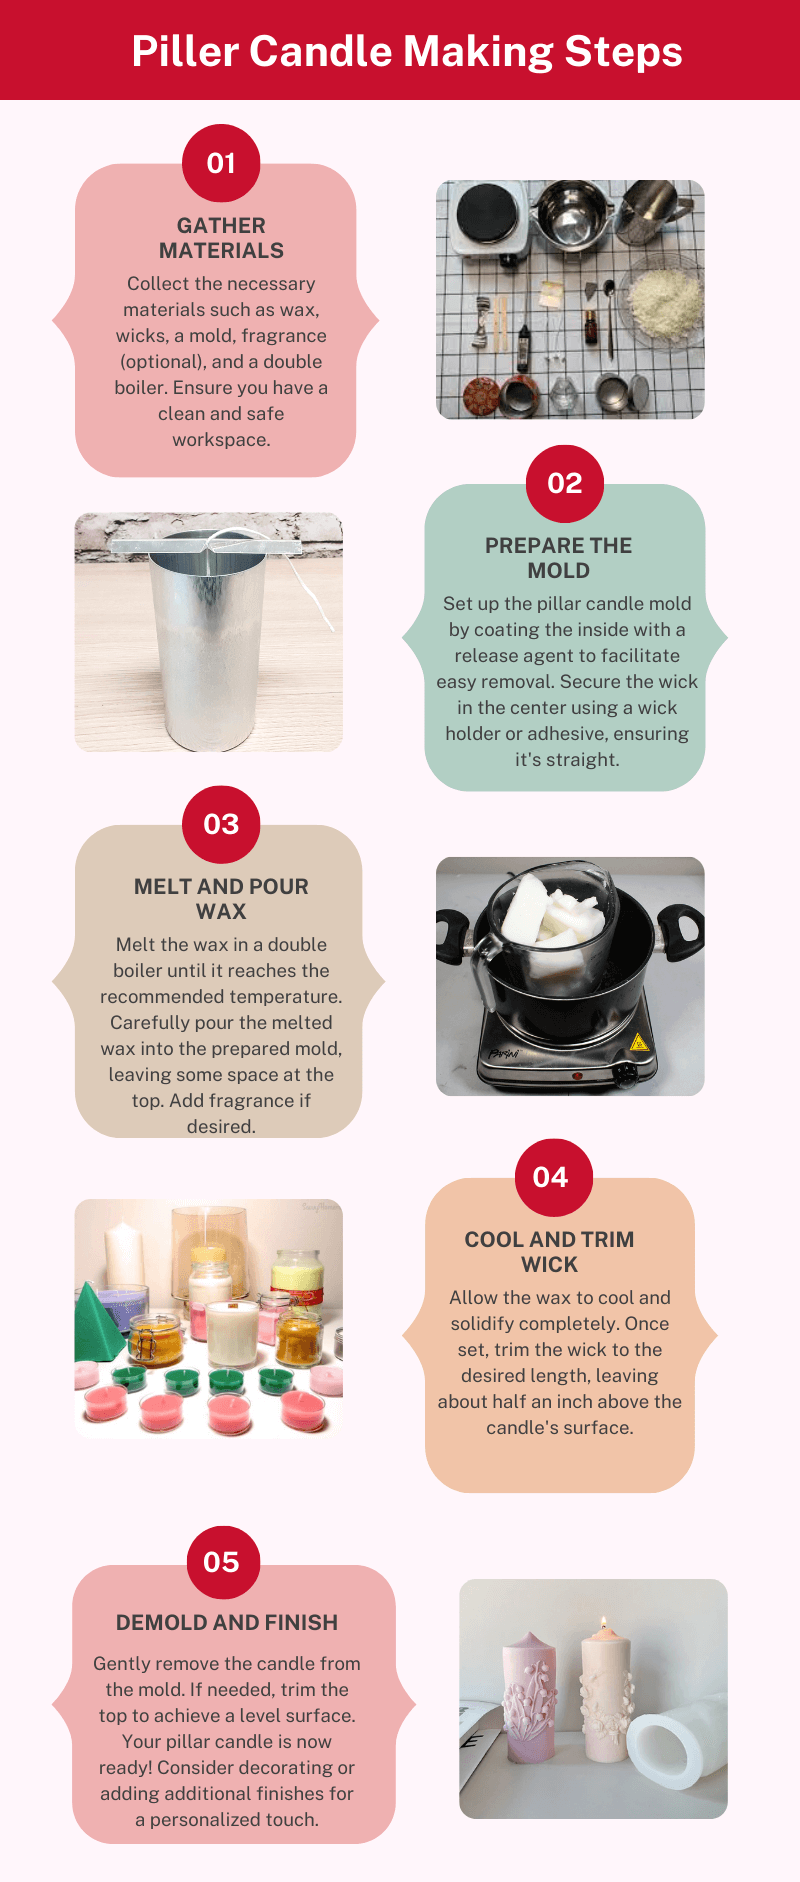
- Prepare the mould: Start by selecting your desired mould size and shape. Metal moulds are ideal for beginners, while silicone moulds offer more intricate designs. If you’re using a metal mould, apply a small amount of mould release spray to the inside and wipe it evenly with a paper towel. This will make removing the candle easier once it has hardened.
- Melt the wax: Fill your double boiler or pot with water and bring it to a boil. Place your wax into the top bowl or heatproof bowl and wait for it to melt completely. Keep an eye on the temperature with a thermometer and make sure it doesn’t exceed 180 degrees Fahrenheit.
- Add colour and fragrance (optional): If you want to add colour or scent to your candle, now is the time to do so. You can use dye blocks or liquid candle dye for colour and fragrance oils for scent. Remember to use a small amount of these additives as they can affect the overall quality of your candle.
- Attach the wick: While waiting for the wax to cool down slightly (around 140 degrees Fahrenheit), you can prepare your wick by threading it through a wick sustainer. Place the sustainer at the bottom of your mould and secure it with a hot glue gun or a small amount of melted wax.
- Pour the wax: Carefully pour the melted wax into your prepared mould, leaving a small amount at the top for later. Make sure to keep your wick centred as you pour.
- Wait for the wax to harden: Allow your candle to cool and harden completely. This usually takes a few hours but you can speed up the process by placing it in the refrigerator.
- Trim the wick: Once the wax has fully hardened, remove the candle from the mould and trim the wick to about half an inch. You can also use scissors to trim any excess wax around the base of the candle.
- Enjoy your handmade pillar candle: Congratulations, you’ve successfully made your pillar candle! Light it up and enjoy the warm glow and lovely fragrance that fills the room. You can experiment with different colours and scents to create unique candles every time.

By following these simple steps, you can now make your pillar candles at home. With a little practice, you’ll soon be creating beautiful and personalized candles to decorate your space or give as gifts to your loved ones.
Tips for increasing the success rate while making a pillar candle
Here are some additional tips to keep in mind while making your pillar candles:
- Choose the right wax: The type of wax you use can affect the outcome of your candle. Paraffin wax is the most commonly used wax for pillar candles but soy wax is a great alternative for those looking for a more natural option.
- Consider the wick size: Using the right wick size is crucial for a successful burn. A wick that’s too small will cause tunnelling, while a wick that’s too large will create excessive flames. Use a wick size chart to determine the right wick for your candle size.
- Preheat the Mold: Warm the mould slightly before pouring in the wax. This can help reduce air bubbles and improve adhesion to the mould.
- Be cautious with fragrances and dyes: Adding too much fragrance or dye can affect the quality and burn time of your candle. It’s best to start with small amounts and gradually increase as needed.
- Experiment with different moulds: Don’t limit yourself to just one type of mould. Experiment with different shapes and sizes to create unique candles.
- Keep safety in mind: Always work in a well-ventilated area and follow proper safety precautions while working with hot wax. Keep a fire extinguisher nearby and never leave melting wax unattended.
Now that you have all the information and tips you need, it’s time to get creative and make your beautiful pillar candles.
Troubleshooting common issues while making pillar candle
Despite following all the steps and tips mentioned above, you may still encounter some common issues while making your pillar candle.
Here are a few troubleshooting tips to help you fix them:
- Sinkholes: These are air pockets that form in the centre of the candle. To avoid this, ensure that your mould is preheated before pouring in the wax and gently tap the mould to release any air bubbles.
- Wet spots: These are white, uneven spots that form on the sides of the candle. To prevent this, make sure your wax is poured at the right temperature and allow it to cool slowly.
- Frosting: This occurs when a layer of tiny crystals forms on the surface of the candle. While not harmful, it can affect the appearance. To prevent this, try pouring your wax at a lower temperature and keep the candle away from drafts while cooling.
- Uneven burn: If your candle burns unevenly, it could be due to a wick that’s too small. Try using a larger wick or trim the existing one slightly.
With these troubleshooting tips and some practice, you’ll be able to make perfect pillar candles every time.
Don’t get discouraged if your first few attempts don’t turn out as expected candle-making is a skill that takes time and patience to master. Keep experimenting and soon you’ll have a collection of beautiful handmade candles to light up any room.
Storing & Preserving Homemade Pillar Candles
To ensure the longevity and quality of your handmade pillar candles, it’s important to store them properly.
Here are some tips for storing and preserving your candles:
- Keep them away from sunlight: Direct sunlight can cause the colour of your candle to fade and affect its scent.
- Store in a cool, dry place: Candles are sensitive to temperature changes, so it’s best to store them in a cool, dry place away from heat sources.
- Avoid stacking candles: Stacking candles can lead to dents and deformities. Instead, place them side by side in a container or on a shelf.
- Use within a year: While pillar candles can last for years, it’s best to use them within a year of making them to ensure the best quality.
- Rotate regularly: If you have a large collection of candles, make sure to rotate them regularly so that they all get used and don’t go to waste.
By following these tips, you can enjoy your handmade pillar candles for a long time to come. Share the joy of candle-making with friends and family by gifting them your unique creations
Conclusion
Crafting pillar candles is a rewarding and creative endeavour that allows individuals to personalize their ambience and decor.
By following the step by step process outlined in this guide, one can successfully produce beautiful pillar candles in various shapes, sizes and colours. Experimenting with different waxes, fragrances and additives provides an opportunity for unique customization, making each candle a truly one of a kind creation.
Whether for personal enjoyment or as thoughtful gifts, the art of making pillar candles offers a fulfilling and enjoyable experience for individuals keen on exploring the world of candle crafting. As with any craft, practice and experimentation will contribute to the refinement of skills, leading to the creation of stunning and aesthetically pleasing pillar candles.
